I've talked a lot about the chair that I have made so far. Hopefully I've explained well enough how the table slides out from underneath the chair but I've made a little animation to show exactly how this works...
Action!
Showing posts with label Chair. Show all posts
Showing posts with label Chair. Show all posts
Monday, 4 January 2010

Sunday, 20 December 2009
Furniture Project
Last week we finished our furniture project.
For the presentation side of things we decided to present our ideas with the use of a massive timeline. This was a very useful method because this was similar to the way we worked as a group throughout the project. Originally we were confining ourselves to our own individual and group sketchbooks and were banging our heads against a brick wall. Limiting ourselves and not allowing our creative minds to be free, the first week really was a struggle - we just could not latch onto any decent ideas!
Ripping our sketchbooks apart and lining our studio walls, we were able to see all the group member's thought processes. Brainstorming and sketching basic ideas allowed us to expand on these and move around the wall freely, adding to each other's ideas. This was really useful and after a small amount of time we were all on the same wavelength - our initial idea was born.
The workshop was a steep learning curve for me! Over the past 6 weeks I have learnt so many new skills and I am sure that I am going to be able to put these into practice for future projects.
 This view shows the finger joints at the front of the seat.
 Side profile of the seat.
 The table sits 10mm away from each of the edges of the seat creating the illusion that it is floating.
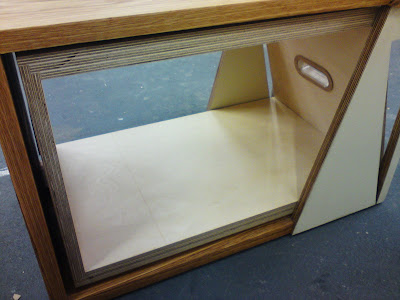
 A back view of how the table sits in the chair.
 A view of the table sliding out of the chair.
 The finished table and chair.
For the presentation side of things we decided to present our ideas with the use of a massive timeline. This was a very useful method because this was similar to the way we worked as a group throughout the project. Originally we were confining ourselves to our own individual and group sketchbooks and were banging our heads against a brick wall. Limiting ourselves and not allowing our creative minds to be free, the first week really was a struggle - we just could not latch onto any decent ideas!
Ripping our sketchbooks apart and lining our studio walls, we were able to see all the group member's thought processes. Brainstorming and sketching basic ideas allowed us to expand on these and move around the wall freely, adding to each other's ideas. This was really useful and after a small amount of time we were all on the same wavelength - our initial idea was born.
The workshop was a steep learning curve for me! Over the past 6 weeks I have learnt so many new skills and I am sure that I am going to be able to put these into practice for future projects.
 This view shows the finger joints at the front of the seat.
 Side profile of the seat.
 The table sits 10mm away from each of the edges of the seat creating the illusion that it is floating.
 A back view of how the table sits in the chair.
 A view of the table sliding out of the chair.
 The finished table and chair.
Wednesday, 9 December 2009
Furniture Project
A little update on the furniture project...
This week we have been focusing on the side supports for the chair - it's crucial that we get these right as this is what is going to make the chair stable. Using butt joints to connect them to the main frame, the outer skin is made more solid. The image below shows the process that was undertook while creating these.

The side supports are made from Birch Plywood and are cut so that the outside edge is flush with the outer edge of the oak base (See above exploded view). The angle at which the Birch Ply intersects the oak made it slightly difficult when cutting so great care had to be taken to insure that the angle was not altered.
A certain amount of thought has been taken when making these side supports as any discrepancy could make the chair unstable when a load was applied.
While cutting the oak for the length of the seat, we made a slight mistake and cut the wood too short (see below).
 With the width of the oak being 24mm short we had to think of something to make it wider so that the oak would be sitting on the Birch Ply (the whole point of the supports). A solution that we came up with was to cut two bits of oak, both 12mm wide, that mimicked the shape of the backrest. These were not simply a square shape and were set at 75º.
 The angle at which the chair sits against the support.
 Template used to mark angle onto wood.
Cutting these parts could have been hard but we made a template that could be drawn around. This was such a time saver and there was no fiddling about with protractors!
We have yet to attach these pieces to the final chair so I cannot really comment on the effectiveness of these yet. Hopefully tomorrow, we will test these and see whether we have solved the problem. If not it's back to the drawing boards as they say.
I thought in this post I should include what our final design should look like seeing as in the last one I just talked about what we hoped for. Also below, is an annotated page from my sketchbook showing the thinking process that had to be undertook for parts of the chair.


This week we have been focusing on the side supports for the chair - it's crucial that we get these right as this is what is going to make the chair stable. Using butt joints to connect them to the main frame, the outer skin is made more solid. The image below shows the process that was undertook while creating these.

The side supports are made from Birch Plywood and are cut so that the outside edge is flush with the outer edge of the oak base (See above exploded view). The angle at which the Birch Ply intersects the oak made it slightly difficult when cutting so great care had to be taken to insure that the angle was not altered.
A certain amount of thought has been taken when making these side supports as any discrepancy could make the chair unstable when a load was applied.
While cutting the oak for the length of the seat, we made a slight mistake and cut the wood too short (see below).
 With the width of the oak being 24mm short we had to think of something to make it wider so that the oak would be sitting on the Birch Ply (the whole point of the supports). A solution that we came up with was to cut two bits of oak, both 12mm wide, that mimicked the shape of the backrest. These were not simply a square shape and were set at 75º.
 The angle at which the chair sits against the support.
 Template used to mark angle onto wood.
Cutting these parts could have been hard but we made a template that could be drawn around. This was such a time saver and there was no fiddling about with protractors!
We have yet to attach these pieces to the final chair so I cannot really comment on the effectiveness of these yet. Hopefully tomorrow, we will test these and see whether we have solved the problem. If not it's back to the drawing boards as they say.
I thought in this post I should include what our final design should look like seeing as in the last one I just talked about what we hoped for. Also below, is an annotated page from my sketchbook showing the thinking process that had to be undertook for parts of the chair.


Thursday, 3 December 2009
Furniture Project - Workshop Based

Thought I should give you a preview of what I've been up to lately...
Brief: design a well made and fully considered piece of furniture.
Another group project and another learning experience. From the very start of this project, it has been very challenging. The new brief challenged us in ways we had never before been asked to...this was the first project that involved us jumping from our sketchbooks in the studio to making an actual finished and working piece. Unlike the scale models where there can be the odd discrepancy - if things are slightly out on our furniture chances are that it will collapse!

A few sketches from my notebook (these were done when I should have really been concentrating on a talk that was being delivered to our class, whoops!).

Designers are well known for trying to think far too complicated and think in strange ways that sometimes 'normal' people cannot understand...well we fell into that trap. Trying to come up with a piece of furniture that was special to someone and that could hide something sentimental to them. It was fine drawing all these ideas into our sketchbooks but we were forgetting one thing...we would have to actually make this.
Now I'm not gonna lie, my skills in a workshop are very basic. I only had good old CDT in first and second year at high school but most of the time spent in there was either making pencil holders or just having a general muck about thanks to us having it last on a Friday afternoon... The only thing I gained from this was being able to sand and knowing how to saw things- this just really didn't prepare me for the shock I was about to get.
Getting a skills day allowed us to gain a basic understanding of the machines down in the workshop and learn a few basic joints (Half and half and mortise and tenon joint) then for the real thing.
To begin with things were slow. Everybody was in the same boat and most of the time was spent standing about trying to work things out for ourselves. This steep learning curve though provided a little self confidence in myself.
I didn't think that I could do half the things that I am learning in the workshop but I'm happy to report that I have successfully managed some manly things! Sawing, chiseling, drilling, you name it, I can do it! Never mind Bob the Builder... Okay well I'm not that good yet (judging by the cut on my hand that I got today while chiseling finger joints...) but I'm getting there.
So I thought I'd upload some pictures of what we've made so far. Don't laugh I'm so happy with it!
 This is only part of the finished piece so far. This is a table that will be slotted in underneath the chair.
 The table is decorated with these oak routes that will be attached to runners on the chair allowing the table to be slid in and out when needed.
 Moving the table is easy with the handles that we have built into the table. These are outlined with a thin oak beading.
And if I've learnt anything so far - KEEP IT SIMPLE!
Subscribe to:
Posts (Atom)
